

Introduction
We are less than 3 months away from CaRMS interviews! Although you are likely working on personal and reference letters, now is a good time to start thinking about your interview. This year, for the first time, interviews will be entirely online from the comfort of your own home. This brings about a whole new topic – how to make your audiovisual stream as awesome as you are.
This article serves as a list of things to think about in terms of “audio”, “environment”, “video” and “other”. It is divided into “Easy”, “Medium” and “Difficult” sections so you may target your efforts based on your tech savviness!
Also, since you are here, why don’t you check out the rest of our CaRMS guide?!
Audio
Easy:
- Use headphones/earbuds instead of the speaker on your computer. This will stop your voice from echoing between your microphone and speaker.
Medium:
- Consider placing some foam or drape some sheets in your interview room to reduce the echo from bouncing sound waves.
Difficult:
- Laptop/headphone microphones have poor sound quality. As an example, think about how a phone call sounds in contrast to your favourite podcast. To get buttery smooth audio, you need to purchase an external microphone that connects to your computer with a USB. Before you buy, ensure that your computer has enough USB ports to fit all of your equipment. A good microphone can expensive (usually over $120), but well worth the money. I recommend sticking to well-known brands like “Rode”, “Blue” or “Thronmax”. If you are not sure what to purchase, google “best microphones for podcasting”. Some external microphones include a plug in for your headphones – this way, you can monitor your own voice while also hearing questions from your interviewer; read more about this here.
- Consider purchasing a pop filter – this is a piece of cloth or other material that separates your mouth from the speaker. These can be inexpensive and block out harsh sounds from your mouth like “p”, “b” and “sss” that may be loud and distracting.
If you have a limited budget – I recommend spending money on audio equipment instead of video equipment. The sound quality in your interview is far more important than a marginal improvement in video quality.
For comparison, here are three recordings of my voice – one from headphones, one from my laptop and one from my Rode VideoMic.
Environment
Easy:
- Your background is a nice way to individualize yourself, allowing interviewers to ask you about the things you display. Consider placing some of your favourite artwork, books, or prized possessions behind you! Whatever your interests may be, get creative!
Medium/Difficult:
- Consider using backlighting to provide depth to your background or highlight things that you may be displaying. Since you will likely be using lights to illuminate your face (see below), the background may appear a bit dark. Backlighting can be as easy as sticking a lamp in front of your painting, or more nuanced to create depth in your background.
Avoid the use of greenscreens or virtual backgrounds – these are distracting and invariably cheesy.
Avoid sitting right beside a window or having one in your background. The changing lighting conditions will make your video inconsistent and may be distracting (example – if a passing cloud suddenly darkens your face). You can even block out a window with cardboard to remove this potential issue completely!
Video
Easy:
- Elevate your computer so that the camera is at or slightly above the level of your eyes. Not only does this improve the angle of your face, but it will give the impression of confidence from your improved posture.
Medium:
- Purchase some additional lights to help illuminate your face. Simply using the overhead light in your room will not be enough to make the camera perform well. Consider using a “soft box” to diffuse the light – you can use a white sheet between you and the light to achieve this effect without spending a lot of money.
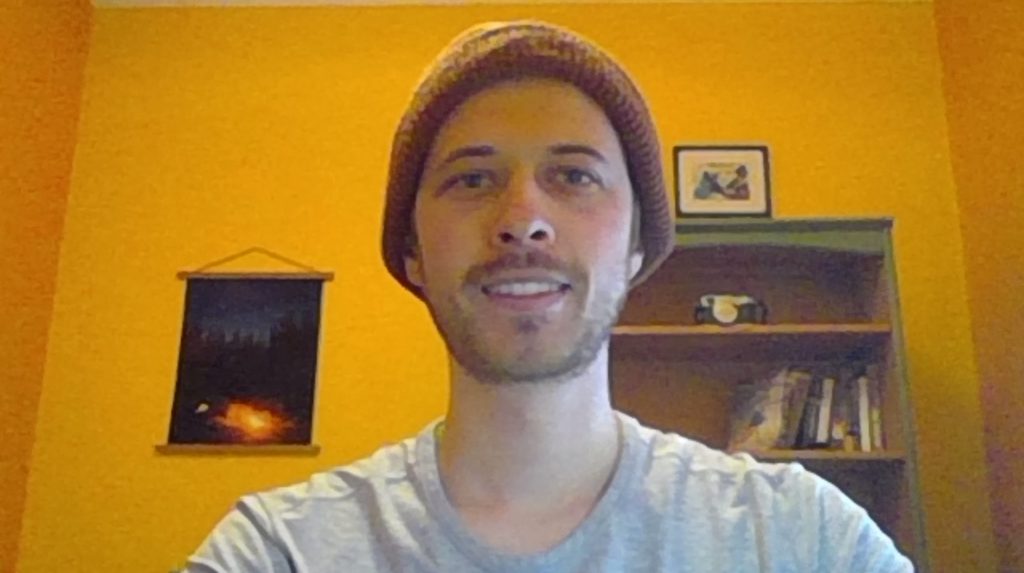
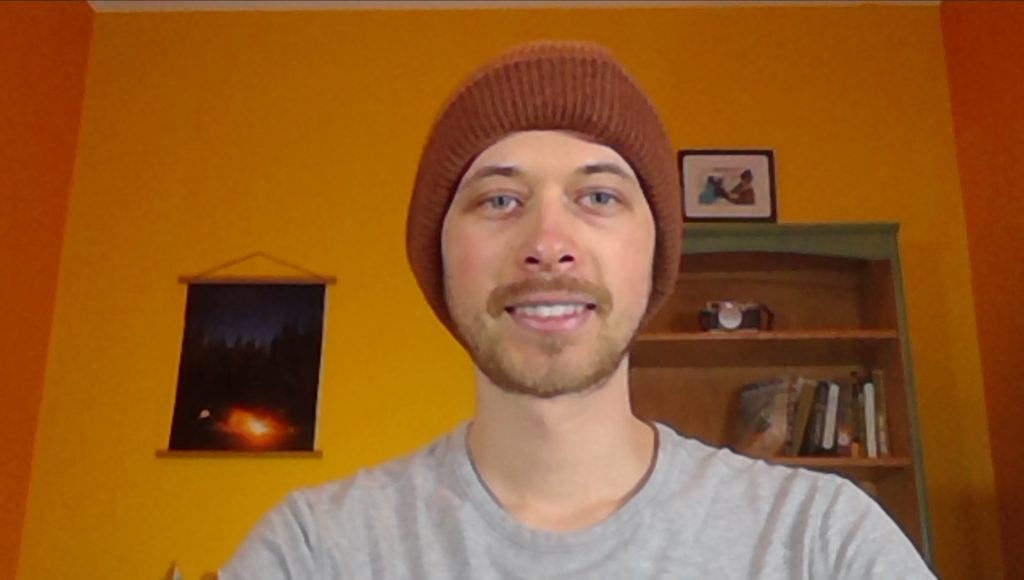
- Experiment with your lighting setup by starting a meeting without anyone else in it. Move your lights around and see what arrangement looks the best. I recommend creating a more interesting look by placing more lights on one side of your face (see photos below).
Difficult:
- Purchase a camera in addition to the above suggestions (suggested DSLR or mirrorless. Could also purchase a high-definition webcam). Some brands (like Fuji or Canon) have created software so that you can use your camera as a webcam – using this method, you can achieve professional quality video streaming. For more information, start with this article:

Other
Easy:
- If possible, utilize a wired internet connection through an ethernet cable. The last thing you want is for your Wi-Fi to drop out! Wired connections are also faster than Wi-Fi, so may reduce the number of interruptions or pauses in your interview. Look out though – most laptops can only be used with Wi-Fi!
Medium:
- Flip through the audio and video settings in the conferencing software that will be used for interviews. In Zoom, I recommend to:
- Video: turn on high definition.
- Audio: disable echo cancellation (only if you are using headphones), enable high fidelity music mode, enable auto or low background noise suppression.
Difficult (camera jargon alert):
- If you are using a mirrorless or DSLR camera, consider the importance of the depth of field of your image. It seems nice to make your background into a wonderful bokeh (pleasantly out of focus), but if you move forwards or backwards, you may become out of focus. Since nothing is worse than watching blurry video, I suggest running your camera at a slightly short focal length (35-50mm) (AKA wide angle) and a small aperture (F/8-16) to give you some wiggle room. Note that when making your aperture smaller, you may require brighter lights to avoid poor image quality. Consider looking at depth of field charts to help make this calculation.
- Note: If I use my camera at F/2.8 and at 35mm, my depth of field is 9cm. Although my background might look beautiful, if I move during the interview my face will be out of focus, rendering this effect completely useless.
If you are using an older or inexpensive laptop, I would recommend considering the increased burden that high-definition video will place on your computer processor. Some computers may be unable to video-conference in high definition!
There is a lot of content on YouTube to add to this article. I recommend watching these two videos to start!
My set-up:
Audio:
- Microphone: Thronmax MDrill One Pro with a cheap pop filter (not in the photo below). This is connected to my desktop computer using a USB port.
- Headphones: I will likely be using a pair of noise cancelling headphones.
Environment:
- Lights: Three 10W LED light panels to illuminate my face. One 10W LED light panel to act as backlighting.
- Background: A print of one of my favourite photos. Small bookshelf with books on rock climbing, cooking, photography, medicine. Small camera placed with books.
Video:
- Fuji X-T3 on a small tripod. My computer has the free software to use it as a webcam (called Fujifilm X Webcam 2). This camera is connected to my computer with a USB-C cable.
- My lens is set to 23mm and auto exposure (auto aperture and ISO) due to the recommended settings for Fuji X Webcam 2. However, if I had to specify an aperture, I would choose F/11.
- My computer monitor is not in the frame for the purposes of this demonstration, but I intend to place it below my camera.

As a last point, make sure to test your set up by video calling family and friends before your interviews!
Reviewing with the Staff
In the context of the pandemic, job interviews in almost all industries will occur primarily over online platforms. When it comes to residency interviews, many electives have been cancelled and you may not have had the opportunity to meet program directors and other faculty members face-to-face. Therefore, your interview may be the very first time you meet those faculty members and you want to make that first impression a great one. Whether you are a resident, medical student, pre-medical student, or even from a different profession entirely, this post will help you look and sound your best!


Alex Senger
Latest posts by Alex Senger (see all)
- Tiny Tips: Hematuria: IS THIS PP RED? - October 31, 2023
- Case Report: Battlestar’s death in The Falcon and the Winter Soldier – a Review of Blunt Cardiac Injury - January 25, 2022
- “CanadiEM Presents” Video Interview Series – Hot Wings with Dr. Brent Thoma - January 26, 2021