

This episode of CRACKCast covers Rosen’s Chapter 77, Pleural Disease. This episode dives into the physiology and pathophysiology of pleural disease, as well as a step-wise approach to choosing appropriate therapy to treat pneumothoraces. Although not something we might encounter on every emergency shift, this is core information that every emergency practitioner needs to know cold.
[bg_faq_start]Rosen’s in Perspective
The pleural space is not to be trifled with, as we’ve previously discussed. For a review of other pleural pathologies listen to chapter 26 for approach to pleuritic chest pain, and 45, trauma and the pleural space.
In normal physiology, the pleural space has a negative pressure (as in less than surrounding atmospheric pressure), which allows our expanding chest wall to ‘suck open’ our lungs. Pleural pressures are -10 to -12mmHg during inspiration, and -4mmHg during expiration. In the bronchioles and alveolar pressure vary from -1mmHg to -3mmHg during inspiration and +1mmHg to +3mmHg during inspiration.
If you imagine the negative pressure vacuum maintaining the tight junction between pleura and lung, a violation of this barrier will cause air to rush into the pleural space during inspiration along the gradient. The problem is most pneumothoracies demonstrate a valve effect, and thus pressure stacks as volume accumulated in the pleural space cannot leave.
Once intrapleural pressure reaches above 15 – 20mmHg (remember always the answer for elevated compartment pressures), venous blood flow through the SVC and IVC is impaired. Let it keep going = complete cardiovascular collapse
Before we dive in, let’s define some things:
Pneumothorax: free air in the intrapleural space
Spontaneous PTx: no obvious precipitating factor (ie no trauma and we didn’t do it / iatrogenic)
Primary Spont Ptx: no obvious underlying lung disease
Secondary Spont Ptx: due to underlying pulmonary disease
[bg_faq_end] [bg_faq_start]1) List 5 risk factors for 1° spontaneous pneumothorax
- Tall
- Male
- Smoker
- Changes in Ambient atmospheric pressures
- Hx Mitral valve prolapse
- Marfan Syndrome
- Family History of primary pneumothorax
2) What is the most common pathophysiologic cause of pneumothorax?
Primary: Even though this is technically in a person without lung disease, the most common cause is unrecognized pleural disease and rupture of a bleb
Secondary: Easy, COPD – accounts for 70% of cases
Severe COPD is at highest risk (FEV1 <1L). Rupture of atypical blebs is typical cause
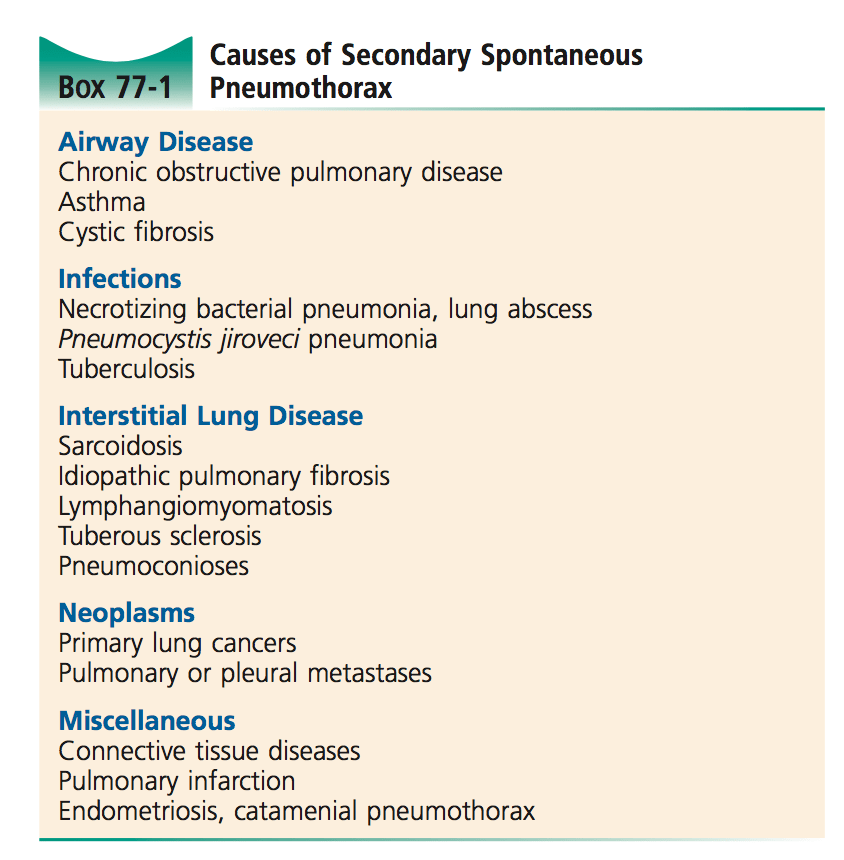
[bg_faq_end] [bg_faq_start]3) List 8 causes of 2° spontaneous pneumothorax
4) List 5 clinical findings suggestive of tension pneumothorax
General signs of pneumothorax : absent breath sounds, inflated ipsilateral chest, hyper-resonance etc.
Tension:
- Tachycardia (typically >120)
- Hypoxia w/ profound dyspnea
- Hypotension
- JVD
- Displacement of trachea to CONTRALATERAL side (away from PTX)
5) Describe how to estimate the size of a pneumothorax

Another technique, according to LITFL
https://lifeinthefastlane.com/collections/ebm-lecture-notes/spontaneous-pneumothorax/
Degree of collapse? (small or large):
Small: visible rim < 2 cm at level of hilum.
Large: visible rim ≥ 2 cm (equates to approximately 50% collapse)
[bg_faq_end] [bg_faq_start]6) Describe the management of 1° and 2° spontaneous pneumothorax
Small
Healthy patient w/ Small Ptx : <20% hemithorax can elect for observation alone. No need for admission if normal oxygenation and hemodynamics. Normal reabsorption rate is 1-2% of PTX air per day. Can increase this by factor of 4 with the administration of 100% oxygen and subsequent nitrogen washout. In a nutshell, this is because: lower alveolar partial pressure of nitrogen increases the rate at which air diffuses across the pleural-alveolar barrier
Follow up with ED or GP in 24-48hrs. Avoid air travel and underwater diving / scuba diving until PTX has fully resolved
Large
-Primary or any secondary (>20%)
-Catheter insertion and aspiration of PTX
-If no re-accumulation on CXR after 6 hrs, d/c home and same caveats as above. (not likely to work if age >50 or more than 2.5 L aspirated)
If persistent leak:
Small bore chest tube / pigtail insertion
In summary: as Chris Nickson so eloquently puts:
- tension: decompress immediately
- minimal symptoms, < 3cm -> O2 and observe
- symptomatic, > 3cm -> small bore chest drain
- if persistent after 10 days of an ICC: look for foreign body, tumour or mucus plug -> call cardiothoracic surgeon for VAT’s
Or for you visually check out this easy summary from the GURUs at FOAMCAST:

http://foamcast.org/2016/03/19/episode-36-pneumothorax/
[bg_faq_end] [bg_faq_start]7) Describe the procedure needle aspiration of a pneumothorax
List 3 benefits of this over tube thoracostomy
http://rebelem.com/what-is-the-best-anatomic-location-for-needle-thoracostomy/
http://www.trauma.org/archive/thoracic/CHESTtension.html
http://foamcast.org/2016/03/19/episode-36-pneumothorax/
Lots of discussion over location, see above.
- Clean and anesthetize as needed
- In short need AT LEAST a 16 gauge or larger
- Place in 2nd ICS MCL or 5th ICS AAL
- Remove needle and leave cannula in place
- Proceed to immediate tube thoracostomy
- Fast
- Less pain
- Less infection
8) Describe the procedure of tube thoracostomy
List 6 complications of TT placement and 2 contraindications.
http://thetraumapro.com/2017/03/28/video-how-to-insert-a-chest-tube-adult/
https://lifeinthefastlane.com/own-the-chest-tube/
https://emcrit.org/podcasts/needle-finger-thoracostomy/

Complications:
- Infection
- Laceration of IC artery
- Laceration of IC vein
- Nerve Injury (Long Thoracic)
- Laceration of Lung
- Intra-abdominal placement
- solid organ placement of tube
- Subcutaneous emphysema
- Re-expansion pulmonary edema
- Old school complication: penetration of mediastinal structures with trocar: DON’T USE A TROCHAR
9) List 10 causes of pleural effusion. What is the most common transudative and exudative?

10) What is starling’s law and how does it apply to the development of pleural effusions?
![]()
Jv= is the net fluid movement between compartments.
![]() is the net driving force,
is the net driving force,
Pc is the capillary hydrostatic pressure
Pi is the interstitial hydrostatic pressure
πc is the capillary oncotic pressure
πi is the interstitial oncotic pressure
Kf is the filtration coefficient – a proportionality constant
σ is the reflection coefficient
But none of us like Math, but we like Starling: same guy in Frank-Starling Curve.
Accordig to Wiki:
-In short: Starling’s Law helps us to understand fluid dynamics across a capillary membrane.
– Comes down to the interplay between filtration and reabsorption along a fluid bed.
-The net effect of all the factors impacting the above dictates the overall direction and intensity of filtration
-Think hydrostatic (due to the forces involved in blood flow) and oncotic (due to plasma proteins) forces (the so-called Starling forces) in the movement of fluid across capillary membranes.
Capillary fluid movement may occur as a result of three processes:
- Diffusion (movement from high concentration to low – governed by concentration gradient)
- Filtration (separation of solids from fluids)
- Pinocytosis (cells eating up things)
Now onto pleural space and fluid…
- Pleural fluid produced from systemic capillaries in parietal pleural surface then absorbed into pulmonary capillaries at the visceral pleural surface
- Lymphatics remove pleural fluid.
- Enter Starling’s forces
- approx 1 L of fluid goes through pleural space in 24 hours
- In normal conditions the amount of fluid that remains in the pleural space is small (~0.1-0.2mL/kg body weight): clinically or radiographically undetectable.
- Pleural effusion happens when influx of fluid exceeds efflux.
11) List 5 chest x-ray findings of pleural effusion
*Note: Need 250-500cc of fluid to be apparent on AP/PA CXR*
U/S is more sensitive… scan your patients!
Upright
- Blunting of costophrenic angles on upright CXR
- Hemidiaphragm obscured (larger effusion)
- Upward concave meniscus (layers higher lateral than central)
- Extension into major fissure
- Total opacification of hemithorax
Supine
- Asymmetrical haziness or contrast difference on supine
- apical capping
- obliteration of the hemidiaphragm
- widened minor fissure
12) Describe Light’s Criteria for pleural effusion and list 5 other tests to perform on pleural fluid.
Spaced repetition from last chapter…

- Cell count (High counts = empyema)
- Glucose (Pleurisy, malignancy or esophageal rupture)
- Amylase (pancreatitis, esophageal rupture or malignancy)
- Gram stain and culture
- Cytology
A pH <7.0 is strongly suggestive of empyema or esophageal rupture: these patients need a tube thoracostomy
13) Describe the procedure of thoracentesis. List 2 contraindications and 5 complications
http://www.tamingthesru.com/blog/procedural-education/thoracentesis
Step 1.) Gather all of the appropriate supplies and set-up the kit within reach. Make sure that the catheter easily moves over the needle. Draw up 5-10cc of 1% lidocaine with epinephrine or other local anesthetic of choice.
Step 2.) Place the patient on telemetry, BP and O2 sat monitor.
Landmarks for thoracentesis
Step 3.) Have the patient in the sitting position with some lumbar flexion and with the arms resting on a bedside table for support. If the patient is unable to maintain the position on their own have an someone available to assist them. Alternatively, if the patient is unable to sit erect, place them in a supine position with the arm abducted above the head.
Step 4.)Verify the procedure is to be performed on the correct side of the thorax using physical exam and radiography.
Step 5.) Before prepping and draping the area, use the low frequency US transducer to identify the superior border of the effusion, the respiratory motion of the diaphragm, consolidated lung deep to the effusion and the liver or spleen caudally depending on the laterality of the procedure. Using a marking pen or the end of a needle cap, place a mark 1-2 intercostal spaces below the superior aspect of the fluid level in the mid-scapular or posterior axillary line just superior to the rib to avoid the neurovascular bundle that runs inferior to the rib. Do not mark below the 9th rib to avoid diaphragmatic or abdominal organ injury when the needle is inserted. For reference, the inferior tip of the scapula is at the 7th rib in the average, upright adult with the arms by the side. During this step, the depth of the superficial border of the pleural space and the center of the fluid collection should be measured to estimate the depth of needle insertion.
Step 6.) The operator should then mimic the angle of insertion of the needle by placing the US transducer flush at the skin mark and verify the window is safe with the angle utilized.
Step 7.) Once the area is appropriately marked prepare the skin with antiseptic of choice in a circular area via sterile technique. Place sterile towels or a sterile drape around the site. Also, cover the high-frequency transducer with a sterile probe cover.
Step 8.) Using a 22 or 25-gauge needle form a skin wheel with anesthetic at the marked injection site. A longer needle than those supplied in the standard kit may be required depending on the amount of subcutaneous tissue.
Step 9.) Using the sterile high-frequency probe, verify the location of the fluid pocket deep to the skin wheel. The proceduralist may chose to measure the depth the needle will have to be inserted to reach the effusion at this step as well. (4)
Step 10.) Next, with the transducer in the transverse orientation, introduce the needle alongside the transducer using the “in-plane” method and visualize the needle entering the pleural space while intermittently aspirating and injecting as the needle progresses through the subcutaneous tissues to adequately anesthetize the subcutaneous tissue. Inject the remaining anesthetic at the parietal pleura which is typically the most painful portion of the procedure.
Step 11.) Pierce the skin with a scalpel at the insertion site to ease entry of the catheter through the skin.
Thoracentesis Needle with syringe for diagnostic sample
Step 12.) Attach the needle-catheter unit to a 10-mL syringe. Using the high-frequency probe, repeat the “in-plane” technique and advance the needle-catheter unit to the depth measured in the previous step while maintaining slight, constant negative pressure on the syringe. Alternatively, if an assistant is available to hold the US probe, grasp the needle-catheter unit with index finger and thumb of the non-dominant hand at the previous measured depth for stabilization and use the opposite hand on the syringe.
Step 13.) Once pleural fluid is encountered stop advancing the needle and set down the US probe. Direct the needle slightly caudally and advance the catheter over the needle while holding the needle steady.
Step 14.) Withdraw the needle. If the kit being used does not have a self-sealing valve where the needle leaves the catheter, immediately cover the open lumen of the catheter with the thumb to prevent air entry into the pleural space.
Step 15.) Attach a 60ml syringe to the 3-way stopcock on the end of the catheter and obtain a fluid sample for analysis
Step 16) If a therapeutic drainage is being performed, at this point fluid may be removed by aspirating with the syringe and then expelling the fluid through a one way valve into a collection bag or by attaching the high-pressure tubing to the stopcock and allowing fluid to drain into a vacuum container. If removing the syringe or changing vacuum bottles, turn the stopcock off to the patient to prevent air entry into the pleural space
Step 17.) Once the desired amount of fluid is removed or the flow ceases or the patient experiences any new symptoms, turn the stopcock off to the patient and slowly remove the catheter.
Step 18.) Place a sterile bandage over the insertion site
Contraindications:
-There are no absolute contraindications
- Platelets < 50
- Very small pleural effusions (<1cm)
- High PT/PTT
9 complications:
- Pain at the puncture site
- bleeding (eg, hematoma, hemothorax, or hemoperitoneum)
- Pneumothorax
- Empyema
- soft tissue infection
- spleen or liver puncture
- vasovagal events
- seeding the needle tract with tumor
- adverse reactions to the anesthetic or topical antiseptic solutions
Wisecracks
[bg_faq_end] [bg_faq_start]1) What is Catamenial pneumothorax? How is it treated?
AKA thoracic endometriosis syndrome. Recurrent ptx associated with menses (typically within 72 hrs)
Primary tx as above (IE chest tube) and addition of ovulatory suppression therapy
[bg_faq_end] [bg_faq_start]2) How do you properly Secure a chest tube?
Own the Chest tube!
Check out: https://lifeinthefastlane.com/own-the-chest-tube/
Also: https://www.emrap.org/episode/littletubes/criticalcare
Roberts and Hedges:
Stay suture : single interrupted with tails let long to wrap around tube, or
Horizontal Mattress: encircle tube (nice for removing to close skin)
Check out other techniques from Roberts and Hedges:

3) Describe the seldinger technique for chest tube insertion
https://lifeinthefastlane.com/ccc/bougie/
https://emcrit.org/misc/bougie-guided-chest-tube/
http://www.ajemjournal.com/article/S0735-6757(15)00862-1/references
Normal procedure, except add a bougie after kelly goes into chest so you can use it (bougie) to railroad tube over. Helpful in bariatric patient or difficult to position (Flail chest)
Its radio-opaque, so you can fire an xray to confirm position
4) What are the false positives for PTX on lung U/S?
- Blebs
- pleural scarring
- severe acute respiratory distress syndrome (ARDS)
- single-lung intubation
This post was edited and uploaded by Ross Prager (@ross_prager)

Adam Thomas
Latest posts by Adam Thomas (see all)
- CRACKCast E191 – Weapons of Mass Destruction - July 2, 2018
- CRACKCast E189 – Air Medical Transport - June 25, 2018
- CRACKCast E188 – Emergency Medical Service: Overview and Ground Transport - June 21, 2018
Justin Roos
Latest posts by Justin Roos (see all)
- CRACKCast E144 – High Altitude Medicine - January 18, 2018
- CRACKCast E134 – Tickborne Illnesses - December 11, 2017
- CRACKCast E133 – Parasitic Infections - December 7, 2017