
Indications
- Wounds are closed or repaired to minimize risk of further bleeding and infection. Suture repair provides support and strength to hold the viable dermal edges together to facilitate appropriate healing. Good suturing techniques provide better approximation of tissues leading to an aesthetically pleasing result and preservation of function.
Possible Complications
- Infection, bleeding, and possible wound dehiscence are the big ones to talk to the patient about. However, a small percentage of patients may have excessive scarring over the wound as well.
Contraindications to Suturing
- Leave certain concave areas of face to heal by secondary intention e.g temples, alar creases, peri-auricular area
- Avulsion injury and tissue loss
- Immediate closure of human bites and certain animal bites may induce wound infections, so delayed closure may be indicated
- Consider specialist consult prior to repairing wounds associated with fracture
- Wounds greater than 12-24-hour old
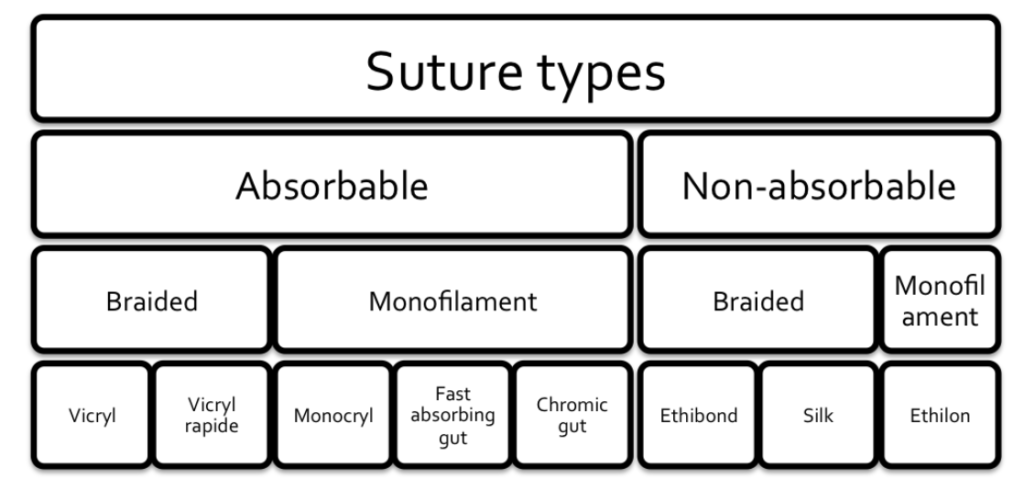
Types of Sutures
- Non-absorbable:
- E.g Nylon (Ethilon), silk, prolene. Can be used to provide longer term tissue approximation and repair most superficial lacerations in the Emergency department.
- Absorbable sutures:
- E.g Monocryl, Vicryl, PDS may be broken down by the body after enzymatic degradation. Half life of 7-14 days. While they do not need to be removed, they may be more likely to become infected. Usually used for multilayer closure or pediatric patients to avoid removal procedure.
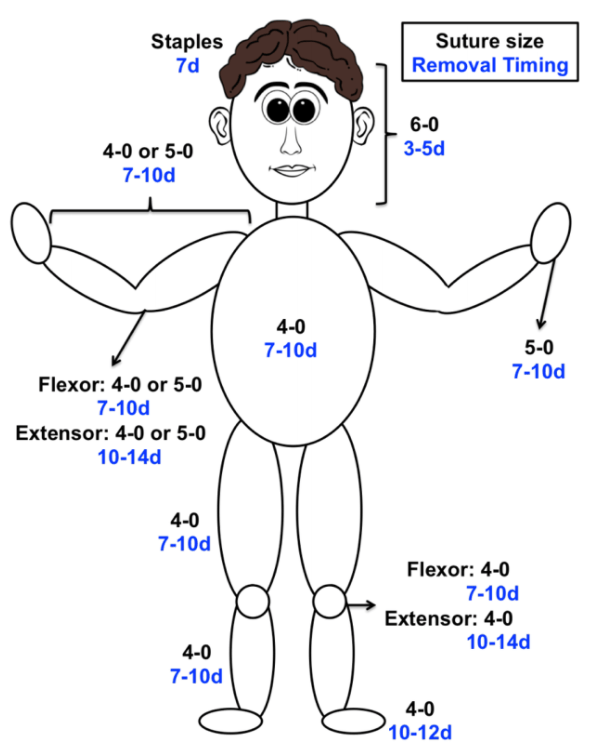
- Suture sizes:
- Thread size in the ED is indicated by a number followed by a “-0.” A larger number indicates a smaller thread diameter. Consider repairing lacerations on extremities with 4-0 or 5-0 and the ones on the face with 6-0 owing to its thickness and smaller size of the needle. A larger diameter suture should be used in areas that may need more tensile strength including over joints, and at high wear points.
- Needle type:
- Suturing needles can be straight or curved, and have either a round/tapered needle or a “cutting” edge to help pass through the tissue. Most suture packs in the ED will be a “reverse cutting” curved needle.
Environment, Material and Equipment Checklist
Environment
- Adjust the light for visibility
- Adjust bed height for ease of procedure
- Use a side table or cart for procedural material
- Keep a trash can nearby for proper disposal of waste
Medications
- Sterile solution: normal saline wash, chlorhexidine, betadine. Normal saline or sterile water can be used for irrigation. However, there is evidence that there is no statistical difference between infection rates with sterile saline wound irrigation compared to potable tap water irrigation. Potable tap water is a safe option for wound irrigation and should be considered if cost or availability of sterile saline is an issue.
- Local anesthetic in a 5 ml syringe (one of the following):
- Lidocaine 1% with 1:100,000 epinephrine
- Bupivacaine 0.25% or 0.5%, with or without epinephrine
- Bupivacaine can be used if need for longer anesthetic for large/complex wounds
- Lidocaine/Epinephrine/Tetracaine (LET) gel – useful for open wounds in children. Apply under a tegederm bandage
- Note: The added epinephrine helps with additional hemostasis, and increased concentration at the injection site. However, it has been classically taught that its inclusion with local anesthetic should be avoided in use in the ears, tip of the nose, distal phalanges, and the penis, because the vasoconstrictive effect of the epinephrine may cause local tissue necrosis. While this theory has been mostly debunked in the literature, the use of local anesthetic with epinephrine in these sensitive locations is controversial.
- Sodium Bicarbonate (NaHCO₃): One part sodium bicarbonate to 10 parts local anesthesia with epinephrine may be added into premixed bottles of lidocaine with epinephrine to lessen the local burning during infiltration.
Materials
- Gauze (4″ bx 4″), sterile sheets, bandage & tape for dressing
- Steri-strips where available
- Window drape for wound, Sterile gloves
- Alternatively, topical skin adhesives (e.g. Dermabond) or Staples provide a fast method for wound closure and have been associated with decreased wound infection rates. Staples are composed of stainless steel & can simplify skin closure
- Needles of various size for administration of local anesthetic
Equipment within a Suture Tray
- Needle driver: use your dominant hand to hold, with thumb and ring finger “Palming”.
- Toothed forceps: hold like a pen, remember to hold the skin edge carefully and gently not to cause trauma to the viable edge.
- Scissors for cutting the sutures, remember to rest the base of the blades against your index finger to maintain better control while cutting.
Points to Focus on
Pre-procedure Preparation Considerations
- Complete History and physical is essential. Document the distal neurovascular status and vitals of the pt, paying close attention to the mechanism of injury, use of anticoagulants or steroids, immunocompromised status and Tetanus status. Remember to assess comorbidities and social determinants of health that may hamper with wound care. Assess for other injuries or foreign bodies with x-ray, ultrasound, or CT.
- Attain hemostasis by pressure and elevation.
- Wash hands, wear sterile gloves, prepare the sterile field and place the window drape around the wound.
- Skin and wound should be irrigated thoroughly, and debride non-viable areas of skin if dirty and ragged.
- Make sure the wound is explored in good light, looking for any signs of deep structural damage e.g tendons, and ensuring no foreign body
- Approximate the wound edges to make a mental map of your suturing and how much material you would require.
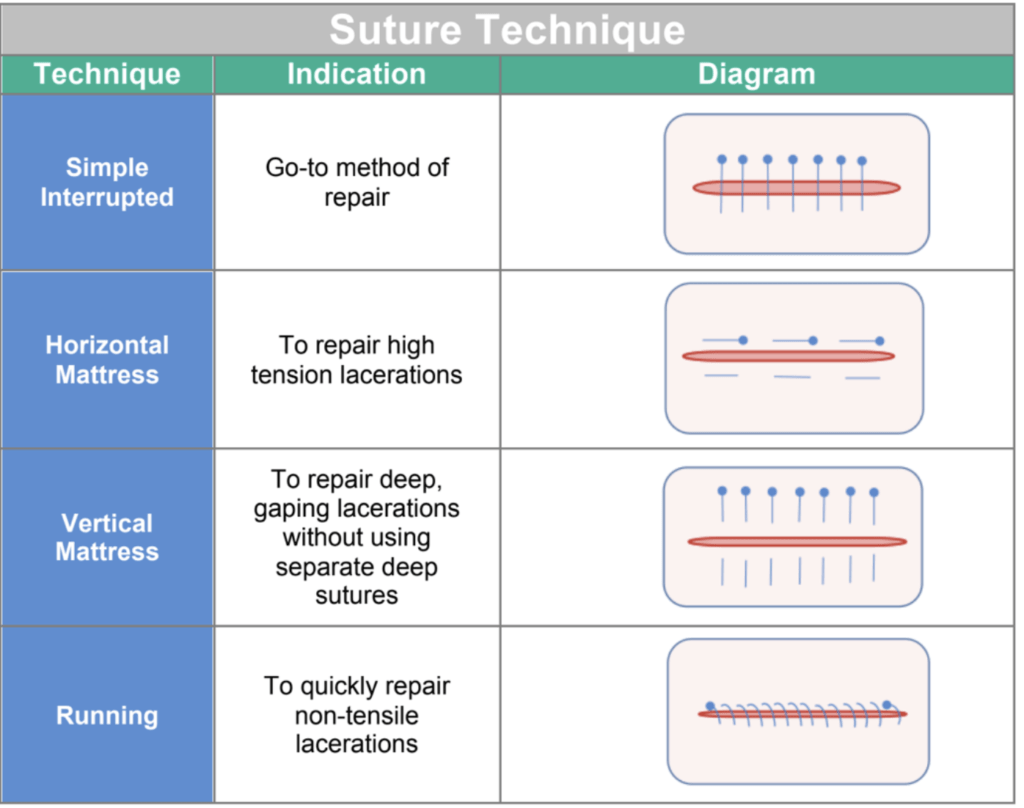
Procedure
Simple Interrupted Suturing
- Infiltrate the skin edges with local anesthetic. If possible insert the needle through the lacerated edge to prevent additional areas of dermal injury. A common technique is to inject the local anesthetic subcutaneously in a circular pattern around the operative site; this administration is often referred to as field block technique. If wound is on a digit, consider a regional/digital block for anesthetic purposed.
- Hold the skin flap with forceps and take a wider bite with the needle, pierce the skin perpendicular ( 90 degrees) to the skin.
- Supinating at the wrist joint, rotate the curved needle through skin to dermis from out to in.
- The needle point should be now visible within the wound. Hold this with the forcep: DO NOT use your fingers to hold the needle wherever possible to avoid needle stick injuries.
- Grasp the needle again with the needle driver and repeat the previous action this time the needle will be seen piercing in from the dermis outward to the skin on the second flap.
- When you have a thread coming out on both sides of the wound, approximate the wound edges to evert.
- Tie the knot as seen in the video above. Caution: do not pull the wound too tight as this may cause tissue ischemia. 8. Remember the rules of approximation favour a good wound closure if the two flaps are everted rather than inverted.
- Once you have knotted the suture, tie a few more knots for strength and cut the thread leaving at least 6-7 mm of thread on both sides. Caution: do not cut these too short.
- Make sure to perform equidistant bites especially in depth to hold the viable tissue together.
- All sutures run perpendicular to a linear wound.
- Try to place equidistant sutures dividing the wound into equal quarters.
Post-Procedure Considerations
- First, dispose of all the sharps in a sharps container, and gauze in the safe bodily fluids disposal bin.
- Wash and dry the wound well, cleaning out any remaining clots or debris.
- Dress with the repaired wound with sterile gauze.
- Appropriate discharge and follow up instructions for suture removal .
Suturing Care and Discharge Instructions
- S- Symptomatic: Pt may take acetaminophen for pain relief
- E- Educate: Sutures also help stop bleeding and speed healing, keep sutures clean and dry, change the dressing and observe for discharge and foul smell
- R- Reassure the patient, remind to limit limb use till completely healed, fill out WSIB form for modified work where warranted
- F- Follow up appointment*
- A- Alarm signs: increased soreness around wound, white or yellow discharge, any foul smelling discharge, uncontrolled bleeding, or fever over 38 degrees, redness around the wound increasing in size
- D- Document the encounter, procedure and preferably draw the wound for reference. Always document the discharge instructions given. Document tetanus status
- * Follow up with the patient, preferably in the primary care setting for wound assessment and suture removal based on the type and location of suture placed. Arrange for wound dressing with nurse in wound clinic where available
Patient Education Tools
- Discharge Instructions: Changing Your Dressing from Krames online
- Laceration Aftercare Discharge Instructions
- Suture Care – Krames Online
Recommended Reading, Videos, and Podcasts
- CanadiEM- Sirens to scrubs, Do you think I need stitches
- CanadiEM – Nice threads
- CanadiEM – Wound Management Principles
- Closing the Gap (LacerationRepair.com)
- Simple interrupted suture video-Geeky medics (4 min)
- EMin5 -Needle stick injury PEP- 5 min video
- Medscape Local anesthetic infiltration
- Medscape Digital Nerve Block Technique
- ACMC EM- Digital Block – Thumb- 1 min video
- Core EM-Digital Nerve Block- 3 min video
- Brian Lin ACEP Digital Block- ring block & anatomy- 2 min video
The following is part of the CanadiEM Frontline Primer. An introduction to the primer can be found here. To return to the Primer content overview click here.
This post was edited by Dr. Geoff Comp DO. This post was copyedited and uploaeded by Johnny Huang.
References
- Chin, Alvin, et al. “Nice Threads: a Guide to Suture Choice in the ED.” CanadiEM, 18 Dec. 2015.
- Denkler, Keith. “A Comprehensive Review of Epinephrine in the Finger: To Do or Not to Do.” Plastic and Reconstructive Surgery, vol. 108, no. 1, 2001, pp. 114–124., doi:10.1097/00006534-200107000-00017.
- Hafner, Hans-Martin, et al. “Epinephrine-Supplemented Local Anesthetics for Ear and Nose Surgery: Clinical Use without Complications in More than 10,000 Surgical Procedures.” Journal Der Deutschen Dermatologischen Gesellschaft, vol. 3, no. 3, 2005, pp. 195–199., doi:10.1111/j.1610-0378.2005.04758.x.
- Ilicki, Jonathan. “Safety of Epinephrine in Digital Nerve Blocks: A Literature Review.” The Journal of Emergency Medicine, vol. 49, no. 5, 2015, pp. 799–809., doi:10.1016/j.jemermed.2015.05.038.
- Krunic, Aleksandar L., et al. “Digital Anesthesia with Epinephrine: An Old Myth Revisited.” Journal of the American Academy of Dermatology, vol. 51, no. 5, 2004, pp. 755–759., doi:10.1016/j.jaad.2004.05.028.
- Lee, Hyunjoo, and Layla Abubshait. “PV Card: Laceration Repair and Sutures – A Cheat Sheet Guide.” ALiEM, 30 Nov. 2019, www.aliem.com/pv-laceration-repair-and-sutures/.
- Schnabl, Saskia Maria, et al. “Clinical Results for Use of Local Anesthesia with Epinephrine in Penile Nerve Block.” JDDG: Journal Der Deutschen Dermatologischen Gesellschaft, vol. 12, no. 4, 2014, pp. 332–339., doi:10.1111/ddg.12287.
- Weiss, Eric Alan, et al. “Water Is a Safe and Effective Alternative to Sterile Normal Saline for Wound Irrigation Prior to Suturing: a Prospective, Double-Blind, Randomised, Controlled Clinical Trial.” BMJ Open, vol. 3, no. 1, 2013, doi:10.1136/bmjopen-2012-001504.

Afsheen Mehar
Dr. Afsheen Mehar is a resident physician at the University of Toronto in the RCPSC Emergency Medicine Training Program. Her greatest passions are medical education, POCUS and austere medicine. She holds an RDMS certification in ultrasound.
Latest posts by Afsheen Mehar (see all)
- CanadiEM Frontline Primer – Incision and Drainage - April 26, 2020
- CanadiEM Frontline Primer – Suturing and Wound Closure - April 26, 2020
- CanadiEM Frontline Primer – Early Pregnancy – First Trimester Bleeding - April 25, 2020